Okta Compromise Investigation Guide for Responders
How to investigate a suspected Okta compromise from the System Log: scope, the eventTypes that matter, the attack chain step by step, and what to contain first.
TL;DR. An Okta compromise almost always leaves a readable trail in the System Log: a reset or a flood of MFA prompts, a sign-in from a network the user never used, a new factor, then admin actions (roles, API tokens, identity providers) and single sign-on into the applications that matter. Export at least the full 90-day retention, read it as a sequence rather than as isolated alerts, contain in the order sessions → factors → admin rights → tokens and IdPs → downstream apps, and investigate every application the attacker opened in its own logs. The free Okta Forensics analyzer does the correlation in your browser without uploading anything.
I have read many identity incident timelines, and the pattern is boringly consistent: the attacker does not exploit anything in the identity provider. They get a person, or a helpdesk agent, to hand over access, and then they use the admin features exactly as designed. That is good news for responders, because designed features are logged. This guide is the method I use; the rest of the investigation series goes deeper on each step.
Step 0: frame the questions
Write them down before you open a single log line. A compromise investigation has to answer five things:
- Initial access. Which account was taken first, when, and how (password guessing, push fatigue, helpdesk reset, stolen session)?
- Privilege. Did the attacker reach an administrator, or grant themselves admin rights?
- Persistence. What did they leave behind: extra admins, API tokens, a new identity provider, weakened policies?
- Reach. Which downstream applications did they open through single sign-on?
- Containment status. Is any of the above still active right now?
Everything below maps to one of these questions.
Step 1: get the whole log, not a filtered view
The System Log API only returns 90 days of data, as documented in Okta's System Log query guide. Start the export now, before evidence ages out, and take the whole org rather than a search for one user: most of the useful correlations (a reset done by someone else, an admin role granted to another account) live in events where your suspect is the target, not the actor.
The System Log export guide covers the API, the Admin Console CSV, Log Streaming and SIEM exports, including the pagination trap that silently drops events.
Step 2: know the attack chain you are looking for
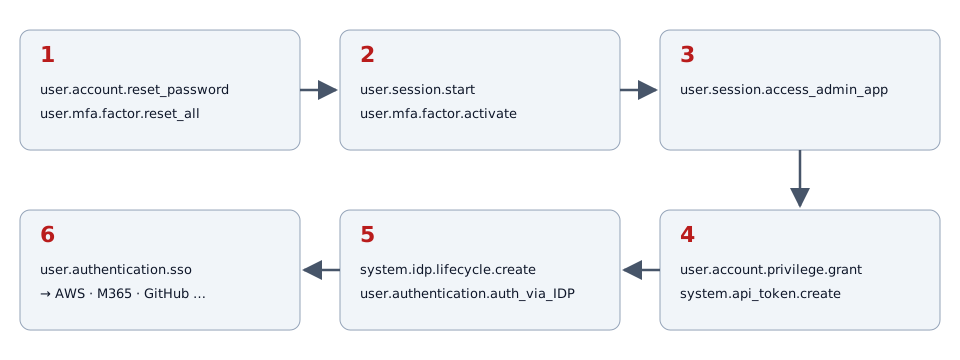
The chain above is not theoretical. In August 2023, Okta Security described attackers who called IT service desks to get the factors of privileged users reset, used the resulting Super Administrator access to grant privileges to other accounts, and configured a second identity provider to sign in as other users (Okta Security, cross-tenant impersonation). The joint CISA/FBI advisory on Scattered Spider describes the same families of techniques, including helpdesk impersonation and repeated MFA prompts (CISA AA23-320A).
Each step has a short list of eventTypes:
| Step | What happens | Key eventTypes | Deep dive |
|---|---|---|---|
| Initial access | Push flood, helpdesk reset, spraying, stolen cookie | system.push.send_factor_verify_push, user.mfa.okta_verify.deny_push, user.mfa.factor.reset_all, user.session.start (FAILURE) | MFA fatigue, helpdesk resets, spraying, session hijacking |
| Foothold | Attacker enrolls their own factor | user.mfa.factor.activate | helpdesk resets |
| Admin access | Admin Console opened | user.session.access_admin_app | admin abuse |
| Privilege and persistence | Roles, tokens, policies | user.account.privilege.grant, group.privilege.grant, system.api_token.create, policy.lifecycle.deactivate | admin abuse |
| Federation backdoor | New inbound IdP, sign-in through it | system.idp.lifecycle.create, user.authentication.auth_via_IDP | cross-tenant impersonation |
| Reach | SSO into AWS, Microsoft 365, GitHub… | user.authentication.sso | this guide, step 6 |
The full lookup table is in the eventTypes responders actually use.
Step 3: find patient zero
Work from the strongest signals down:
- Resets done by someone else. Filter
user.mfa.factor.reset_all,user.mfa.factor.deactivateanduser.account.reset_passwordwhere the actor differs from the target. Then look for auser.mfa.factor.activateby the target shortly after. If that enrollment comes from a network the user never used before, you probably have your entry point. - Push bursts. Several push prompts or rejections for one user within minutes, especially if one is finally accepted.
- Failed sign-ins across many users from one IP, followed by one success.
- One session, several networks. The same externalSessionId seen from two ASNs is the classic trace of a replayed session cookie.
- Where the sign-in came from.
securityContext.asOrg,securityContext.isProxyanddebugContext.debugData.tunnelstell you whether the source is a hosting provider, a proxy or Tor. Employees rarely sign in from a VPS.
Step 4: follow the admin trail
Once you know the compromised account, pivot on it as an actor. List everything it did as an administrator between its first suspicious sign-in and now: role grants (debugContext.debugData.privilegeGranted tells you which role), API tokens, identity providers, routing rules, policy and authenticator changes, network zone edits, ThreatInsight settings. Then repeat the pivot for every account it touched: a freshly promoted admin or a service account signing in through a new IdP is the second attacker identity you must not miss.
Step 5: build the timeline
A defensible timeline has one row per event, in UTC, with actor, target, source IP and ASN, session, and outcome. Keep the raw uuid of each event so anyone can check your reading against the original log. The fictional incident walkthrough shows what that looks like on a complete, if invented, intrusion.
Step 6: follow the attacker into the applications
user.authentication.sso tells you which applications were opened, when and from where, but nothing about what was done inside them. The application's own audit log is the next stop. Sessions in those applications also outlive the Okta session, so killing the Okta session does not log the attacker out of them. For AWS, CloudTrail is the source; the sibling tool AWS Forensics reads it the same way this site reads the System Log. For Microsoft 365 and Entra ID, M365 Forensics does the same.
Step 7: contain in the right order
Order matters because some attacker footholds survive others being removed:
- Preserve the export before you change anything.
- Clear the sessions of the affected users and revoke their tokens.
- Reset factors and passwords, re-enrolling the real user through a verified channel.
- Remove unexpected admin roles, starting with Super Administrator.
- Revoke API tokens created during the incident: API tokens carry their creator's permissions and do not depend on the creator's password.
- Deactivate unknown identity providers and review routing rules.
- Restore policies, authenticators and security settings.
- Revoke sessions inside downstream apps and investigate them.
Okta's own guidance for the 2023 campaign adds hardening that belongs in the post-incident plan: phishing-resistant authenticators, stricter helpdesk verification, and re-authentication for sensitive admin actions (Okta Security).
Doing it with the analyzer
Everything above can be done by hand in a SIEM or a spreadsheet. The Okta Forensics analyzer automates the correlation: drop the export, and it runs 25 detection rules (thresholds, sequences and follow-up conditions) on every event, gives a verdict (Clean, Suspicious or Compromised) with the reasons, a timeline, an entity pivot and a remediation checklist ordered by urgency. Everything runs locally in WebAssembly; the logs never leave your machine. The step-by-step guide shows each screen.
FAQ
How far back can I investigate in Okta?
The System Log API returns 90 days of events. Anything older exists only if it was streamed or exported to a SIEM or storage before it aged out.
Which account should I look at first?
Administrators, then anyone whose password or factors were reset by someone else, then accounts that signed in from a hosting provider or anonymizer. That order follows how recent identity attacks progressed.
Is a clean result proof that the tenant is safe?
No. It only covers the events in the export. Check the period, check that the export was not filtered, and confirm with the people involved. The limitations and tuning guide lists the blind spots.